SCARA management
SCARA management
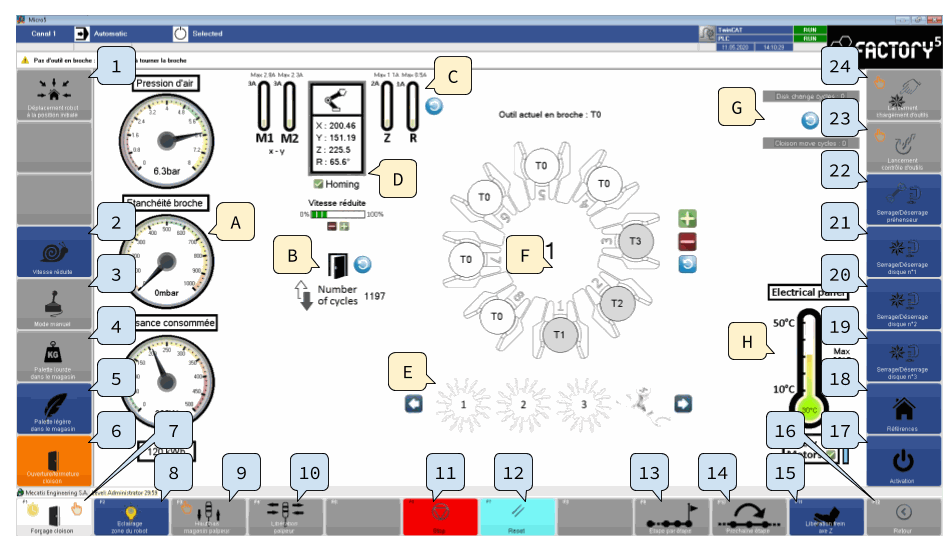
This page shows all the information and functions related to the "SCARA" (Selective Compliance Articulated Robot Arm) handling robot.
Zones
The screen is divided into several parts:
General air pressure: pressure measured at the machine supply
Nominal value: 6 bar (recommended: 5.5 - 6.5 bar)
Spindle sealing: pressure measured at the spindle sealing air supply
Nominal value: 550 mbar (recommended: 500 - 600 mbar)
Power consumption: instantaneous power consumed by the whole Micro5. The value is filtered at 1 sec.
Total consumption: the total consumption of the machine
B) Partition display area
The number of partition cycles is displayed here.
C) SCARA axis state display area
The graphical and numerical indicators show information about the current load of the SCARA axes. The maximum values are also displayed.
D) SCARA state display area
The SCARA's coordinates are shown in this table. The homing state is marked in green. The speed reduction setting is located below.
E) Loaded accessory indication area
The currently loaded accessory is shown here. It is possible to directly enter the accessory mounted on the SCARA,  (I)
(I)
F) Disk display area
The tools present on the disk can be entered in the fields corresponding to their physical position on the disks. To enter the number of a tool on a disk, click on its physical location so that it appears in gray. It is possible to select several locations to be modified. The +/- buttons to the right increment the index of the selected locations.  (II)
(II)
G) Movement display area
Numerical indicators show the number of movements of the disks and the partition.
List of primary functions
Initial position: Initial position: Moves the SCARA to the home position.
Slow speed: By activating this mode, the SCARA movements are executed at reduced speed. The speed is set in the center of the page (Slow motion).
Manual mode: When this mode is active, the movements of the SCARA can be controlled using the remote control.
Heavy pallet in the magazine
Light pallet in the magazine
Opening/closing of the partition: Activation of partition opening. This function is only active if all the conditions for opening the partition are met (doors closed and locked)
Partition forcing [F1] (+T) (+S): Activation of forced partition opening. This function is active even if all the conditions for opening the partition are not met (doors closed and locked).

Robot area lighting [F2]: Activation of the lighting in the magazine area
Probe up/down [F3] (+T) (+S): Activation of the probe lowering system. The probe magazine is lowered and the probe is presented in front of the sliding partition on the side of the machining area, so that it is accessible to the SCARA with a tool holder disk. (II)
 (II)
(II)Probe release[F4]: Activation of the probe magazine retaining tie rod. Used to release the probe in order to remove it by hand. (II)
 (II)
(II)Stop [F6]: Interruption of the current cycle
Reset [F7]: Resetting controls and errors
Step by step [F9]
Next stage [F10]
Z axis brake release [F11].
Back [F12]: Link to homepage
SCARA Activation: Activation of the SCARA axes causes the controllers and motors of all SCARA axes to be slaved. The SCARA can be moved manually when it is disabled. However, care must be taken to return the SCARA to a safe position before reactivating it or performing homing.
SCARA Homing: SCARA homing involves taking the reference of all the axes. As long as homing has not been carried out, the Micro5 does not know the position of the SCARA and therefore cannot perform any movements. The homing phase remains critical and collisions must be anticipated by the operator. (I)
(I)Disk N°3 clamping/unclamping: Activate the collet on tool magazine slot no. 3.
Disk N°2 clamping/unclamping: Activate the collet on tool magazine slot no. 2.
Disk clamping/unclamping N°1: Activate the collet on tool magazine slot no. 1.
Diks clamping/unclamping: Activate the collet on tool magazine slot.
Activate of the pallet lock (+T): Locking the pallet activates the pallet support position lock (Yerly) on the C axis. This function requires a long press (+T).
Activation of the spindle puller (+T): The spindle puller must be activated to allow a tool to be loaded. A tool can only be loaded if the machine is in a safe state (all axes stopped, etc.). This function requires a long press (+T).

I) Risk of collision
Always make sure that the handling accessory present in the SCARA is correctly entered in field E "Indication of loaded accessory". After a reset, a restart or an emergency stop, it is possible that the Micro5 has not correctly stored the accessory loaded on the SCARA. Movement with an attachment can result in collisions and damage to the machine.
II) Risk of damage
Always make sure you enter the correct tool numbers in the correct physical locations on the correct disk. An incorrect indication could lead to damage (e.g. loading a tool other than the expected one). The tool corrections must also correspond to the relevant tools.

I) Homing
The SCARA must be activated in order to perform homing. During the homing phase:
The partition is lowered and raised
The arms are operated at low speed until they reach their mechanical stop.
The disk holder (and disk if installed) rotates to its initial position.
The assembly is lowered at low speed until it reaches its mechanical stop.
The SCARA moves to the initial position..
Before homing, make sure that the following points are met:
The partition's operating area must be free..
If the SCARA arm is in the machining area, it should be manually repositioned in the magazine area.
The SCARA should be located above the tool magazines.
If the SCARA is equipped with a tool holder disk and tools, make sure it is at a height that allows it to perform a complete movement without the tools colliding with the disk holder collets.
The SCARA assembly must be at least 20 mm from its maximum high stop.
Homing cannot be performed if the SCARA is equipped with the paddle gripper.
During homing, we recommend that you pay close attention to the machine's movements
Once homing is complete, the SCARA is ready to perform movements in automatic mode.
II) Probe magazine
When the probe is not in use, plug the female connector with the male connector attached to the cabin.
The probe must not be used for automatic loading when oil is used!
The probe magazine must not be left without a tool for a prolonged period (>10 min)
The probe is not suitable for use with oil.
Do not manually activate the probe when the SCARA is in the machining areaList of secondary functions [+CTRL].
Change of arm direction
Gripper pick-up/set down
If no accessory is mounted on the SCARA, the gripper pick-up sequence is activated.
If the SCARA already has the gripper mounted, the gripper set down sequence is activated..
If another accessory is mounted on the SCARA (tool holder disk), this function cannot be activated.
Disk no. 1 pick-up/set down
If no accessory is mounted on the SCARA, the disk no. 1 pick-up sequence is activated..
If the SCARA already has tool holder disk no. 1 mounted, the set down sequence for tool holder disk no. 2 is activated.
If another accessory is mounted on the SCARA (tool holder disk no. 2 or no. 3 or gripper), this function cannot be activated.
Disk no. 2 pick-up/set down
If no accessory is mounted on the SCARA, the disk no. 2 pick-up sequence is activated..
If the SCARA already has tool holder disk no. 2 mounted, the set down sequence for tool holder disk no. 1 is activated.
If another accessory is mounted on the SCARA (tool holder disk no. 1 or no. 3 or gripper), this function cannot be activated.
Disk no. 3 pick-up/set down
If no accessory is mounted on the SCARA, the disk no. 3 pick-up sequence is activated.
If the SCARA already has tool holder disk no. 3 mounted, the set down sequence for tool holder disk no. 1 is activated.
If another accessory is mounted on the SCARA (tool holder disk no. 1 or no. 2 or gripper), this function cannot be activated.
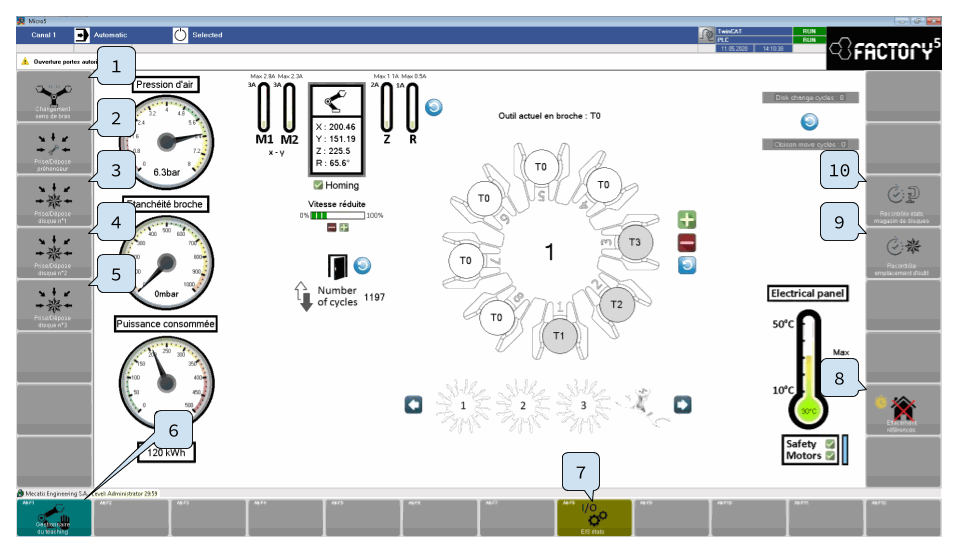
Teaching Manager[ALT+F1]: Link to the SCARA teaching management page
I/O states [ALT +F8]: Link to the inputs/outputs control page
Cancel SCARA homing (+T): This button is used to cancel the current teaching of the SCARA axis origin positions. This function can be activated, for example, if the last homing operation could not be done correctly (obstacle encountered during the process, etc.). If the current teaching operation for the SCARA's origin positions is canceled, the homing procedure must be performed again.
Rechecking tool locations: This button is used to start the tool location checking procedure.
Rechecking disk magazines: This button starts the procedure for checking the disk storage locations.
There are no comments for now.