SCARA teaching
SCARA teaching
This page contains all the information and functions required to teach the preset positions of the SCARA robot.
To access this page you need to be logged as "Maintenance" or "Admin".

(I) Risk of collision
Changing the recorded positions of the SCARA should only be done if position adjustments are required.
The recorded positions of the SCARA should only be changed if positional adjustments are required. Recording incorrect positions can lead to abnormal operation, collisions and damage to parts of the Micro5.
Operating the SCARA in manual mode can lead to collisions and damage to parts of the Micro5. Always be sure to maintain control over the path of the arm and never underestimate the movement distances.
Pay attention to the interactions between the various assemblies and modules. The partition, probe, tool breakage detection or CNC axes can be activated with the SCARA in collision positions. Before activating a function, make sure the SCARA is in a non-interfering position.
The accessory mounted on the SCARA must match the one indicated on the interface. It is very important to check this correspondence before performing any movements. For example: When the gripper is mounted on the SCARA, it must be indicated on the screen.
Never attempt to return to home position or pre-programmed cycles when the gripper is mounted on the SCARA.
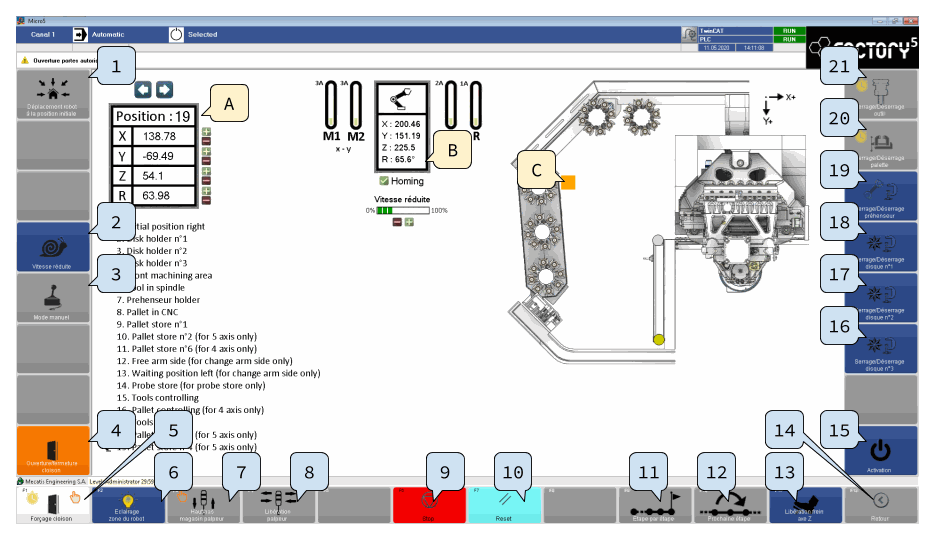
Zones
The screen is divided into several parts:
List of primary functions
Move to initial position: Activate the SCARA to move to its initial position..
Reduced speed: Activation of the reduced speed. The speed reduction rate displayed in the center of the page is then applied.
Manual mode: Activation of manual operation mode. In this mode, it is possible to use the remote control to select the axis to be controlled and the step resolution as well as to adjust the position. Activating manual mode disables the other SCARA control modes.
 (I)
(I)Opening/closing of the partition: Activation of partition opening. This function is active even if all the conditions for opening the partition are not met (doors closed and locked).
 (I)
(I)Robot area lighting: Activation of the lighting in the magazine area.
Probe up/down: Activation of the probe system. The probe magazine is lowered and the probe is presented in front of the sliding partition on the side of the machining area, so that it is accessible to the SCARA with a tool holder disk.
(I) 

Probe magazine
- When the probe is not in use, plug the female connector with the male connector attached to the cabin.
- The probe must not be used for automatic loading when oil is used.
- The probe magazine must not be left without a tool for a prolonged period (>10 min)
- The probe is not suitable for use with oil.
List of secondary functions (+CTRL)

Change of arm direction
 (I)
(I)Gripper pick-up/set down
If no accessory is mounted on the SCARA, the gripper pick-up sequence is activated..
If the gripper is already mounted on SCARA, the gripper set down sequence is activated.
If another accessory is mounted on the SCARA (tool holder disk), this function cannot be activated.
Disk no. 1 pick-up/set down
If no accessory is mounted on the SCARA, the disk no. 1 pick-up sequence is activated.
If the SCARA already has tool holder disk no. 1 mounted, the set down sequence for tool holder disk no. 2 is activated.
If another accessory is mounted on the SCARA (tool holder disk no. 2 or no. 3 or gripper), this function cannot be activated.
Disk no. 2 pick-up/set down
If no accessory is mounted on the SCARA, the disk no. 2 pick-up sequence is activated..
If the SCARA already has tool holder disk no. 2 mounted, the set down sequence for tool holder disk no. 1 is activated.
If another accessory is mounted on the SCARA (tool holder disk no. 1 or no. 3 or gripper), this function cannot be activated.
Disk no. 3 pick-up/set down
If no accessory is mounted on the SCARA, the disk no. 3 pick-up sequence is activated..
If the SCARA already has tool holder disk no. 3 mounted, the set down sequence for tool holder disk no. 3 is activated.
If another accessory is mounted on the SCARA (tool holder disk no. 1 or no. 2 or gripper), this function cannot be activated.
Load basic positions (+T) (+S)
(II)Delete saved positions (+T)(+S)
(II)I/O states
Link to the inputs/outputs display page.
Tool management
This page contains all the information and functions related to management of the tools.
It is not possible to save or export recorded positions.
There are no comments for now.